Target Information and Using the Position Editor
To use the position editor :
Move the yellow highlight to target list and double click, enter a coordinate for your source.
To see the display click on plot at the bottom left.
Alternatively you can start the display by selecting the display tool
icon  at the top right of the program display tool bar.
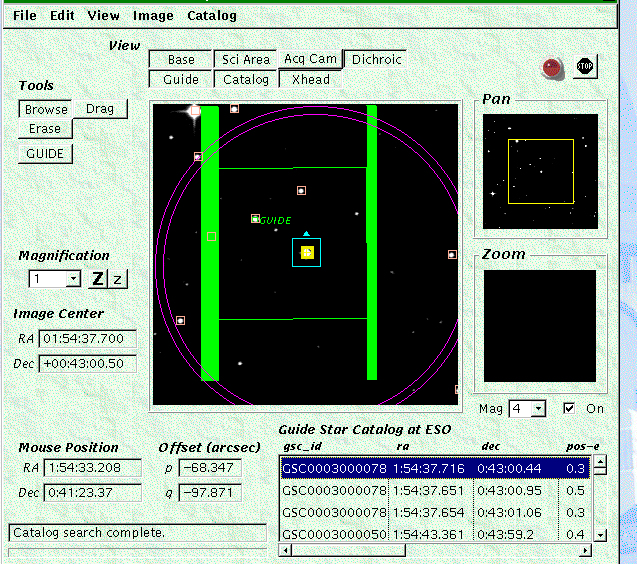
The Position Editor, a graphical
display tool for visualising the observation will open at first
with an empty (black) display window, with the centre of the field (base position) marked by
a yellow "Earth" symbol. The (RA, dec) co-ordinates of the field centre
are shown and the current mouse position within the main window will update.
at the top right of the program display tool bar.
The Position Editor, a graphical
display tool for visualising the observation will open at first
with an empty (black) display window, with the centre of the field (base position) marked by
a yellow "Earth" symbol. The (RA, dec) co-ordinates of the field centre
are shown and the current mouse position within the main window will update.
A view of the field can be generated by connecting to a digital sky
survey server (provided the machine you are using is connected to the Internet
at the time). Download an image from one of the servers (via the Image
menu) and repeat for the guide star catalogue (via the Catalog menu). On-line
catalogues local to UKIRT can be added here. In Europe the ESO catalogues
are usually fastest, in Hawaii connecting to UKIRT or CADC.
The upper-right right window displays a region of sky 15 arcmin on a
side, centred on the base co-ordinates. The yellow box within it indicates
the region displayed in the main window. Click and drag anywhere within
the yellow box to pan. The lower-right box shows a magnified view centred
on the current mouse position. The main and magnified windows can both
be scaled using the magnification drop-down list (or the zoom, Z or z,
buttons, or by typing a magnification factor in the box). Setting the magnification
of the main window at 0.6 allows virtually the full field to be displayed.
The view buttons along the top of the main window allow different aspects
of the configuration information to be displayed. For example, selecting
"Guide" and "xhead range" shows which star will be used for guiding and
whether the xhead can reach it. Selecting "Catalog" shows the stars identified
in the Guide Star Catalogue as potentially usable guide stars. Try this
now.
Here is an example of the position editor showing target, guide stars, the instrument fov, the area covered by the dichroic etc.
To change a previously selected guide star if it is unsuitable
(it's a binary, say) : the
buttons to the left of the main window allow selection, deletion and movement
of several items. To select a different guide star click on GUIDE; note
the "browse" button is de-selected and the cursor changed to a crosshair.
Now select one of the other suggested guide stars (one with a pink box
around it) by clicking near it in the image. Provided the cursor is sufficientlyclose, within the pink box, the software will "snap" to the nearest catalogued
object and the relevant entry in the catalog text box will be highlighted
blue.
If you look back at the Telescope Targets window you will see that the
specified guide star has changed. If the Position Editor gets in the way
of other component displays you can iconify it by clicking in the [x] box
on its top line.
Note that selection of guide stars is not restricted to those in the
catalogue. In this case, the ID in the Telescope Targets list is left
blank (as there can be no translation of the position into a catalogue
name). the tool does not centroid on stars without a catalogue
position, so if you do this it is as well the zoom the image first
Use the "drag" tool to move an object around. For example, click and hold
on a guide star box or the base position to move it around. Note how its
position in the Telescope Targets list is updated.
Use the "erase" tool to remove an object. The cursor changes to an "I"
and you can use it to 'wipe out' the unwanted object.
What the "view" buttons at the top show :
Base - displays the telescope base position i.e.
where the telescope will slew to and where offsets will start from
.
Catalogue - displays the positions of sources in the most recently
fetched catalogue
Xhead - displays the range of motion of the UKIRT crosshead,
centred on the base position. The area between the two circles is where
there is some vignetting.
Guide - shows the location of the specified guide star
Science Area - the field of view of the instrument.
Acq Cam - the field of view of the acquisition camera
Dichroic - the area of the dichroic. This rotates according
to which port the instrument is mounted on. (Currently the implementation
of this is hard-wired, e.g. the code assumes that CGS4 is always on the
south port, but the intention is for it to be controlled through the instrument's
configuration file). The thick green areas indicate the edge of the glass
and its supports (where stars cannot be found/used) and the thin lines
delimit the region of the dichroic coating.
Note that a button to display the region vignetted by the IRPOL
mount will be added when we have a method of drawing the complicated shape
Under tools (on the left) the GUIDE button allows the selection
of a guide star by clicking on the image. The other tools function
Under tools (on the left) the GUIDE button allows the selection
of a guide star by clicking on the image. The other tools function
as they do on the Gemini version of the position editor.
Original Authors: Gillian Wright
Original : 1999/10/24, Last Modification Date 2000/07/26 - Last Modification Author:Gillian Wright