1 Introduction
The following set of tests are intended to be performed when
the optics areclose to their target operating temperature, in order
to verify that the instrument is operating normally. They can be
run automatically using the 'aghealth.exec' exec routine, which
produces 16 frames, whose contents are described in the following
sections. The data set should be reduced using the CHOPCONV script
of ORAC-DR in order to obtain the individual chop beam frames for
the last two frames. The background data can be reduced using the
unix script mhealth.csh. IDLDE program tranchop.pro is required
to analyse the noise frames.
The more detailed tests which determine the performance of each
mechanism, optical path and the detector performance, are described
in the document 'Integration and Testing Report'.
|
2 Instrument Background Photocurrent
2.1 (Frames 0 to 7) Observations of the instrument
background using the starev11small waveform to make single STARE
exposures, with exposure times 'texp' of 0.02 seconds (dark frame)
and then 20, 40 and 60 seconds. In each case, select a 'typical'
pixel in the quick look display and note its signal count, Z (ADU).
The background photocurrent idark [el./pixel/second] is then given
by (Z(texp) - Z(dark)) * kwell / texp (kwell= 200el./ADU for the
small well, or 500el./ADU for the big well). The target acceptable
figure for the background is ~10,000 el./pix/sec. Note the array
temperature during the exposures, it should be around 9.3K.
2.2 Select the spectrometer path with the echelle
operating at 11.6 microns and repeat the background measurement.
2.3 The above data can be reduced automatically
using the unix script 'mhealth.csh'.
|
3 Spectroscopy
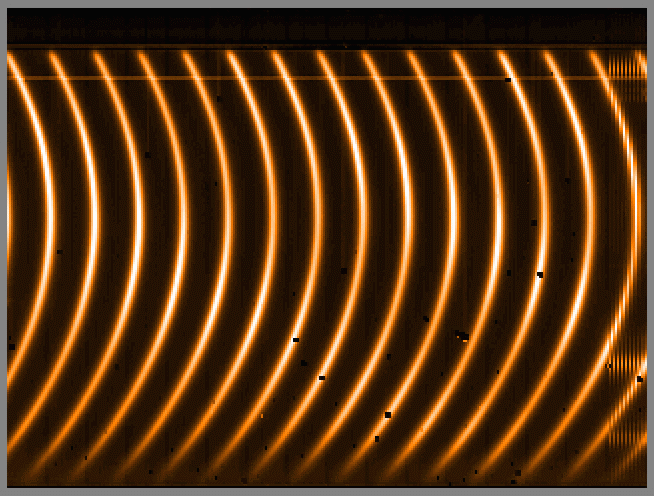
3.1 (Frames 8 to 13) Echelle spectroscopy of the
wavelength calibration etalon (filter combination E116B10) at 11.6um,
with the instrument shutter closed, and the 2 pixel wide entrance
slit selected at a slit rotation angle of 55 degrees. Dark frame
taken using Blank_B, with a typical dark subtracted frame shown
in Figure 3.1. The fringes should peak at about 600ADU above the
(low) troughs between, and have a FWHM of about 3 pixels.
|
 |
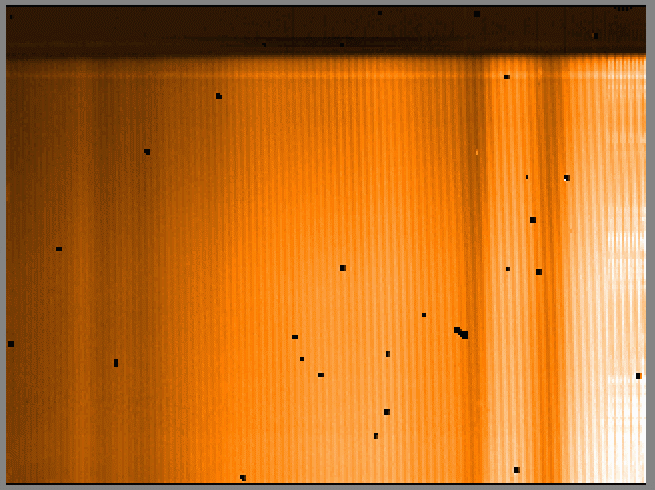
| 3.2 (Frames 11 and 12) Observe the WCalLowN
filter combination (the polystyrene calibration filter), using the
MedN1 grating at 8.5um, followed by a dark frame. The difference frame
should look like Figure 3.2, with the signal rising from ~15,000ADU
at the left to ~50,000ADU at the right. |
 |
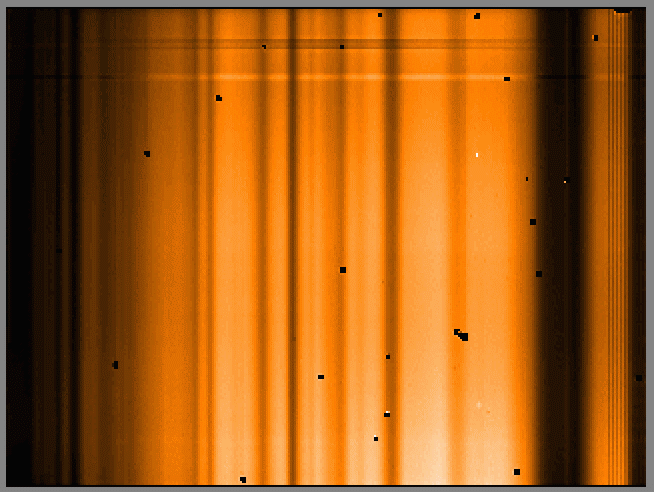
| 3.3 (Frames 13 and 14) Observe the WCalLowN
filter combination (the polystyrene calibration filter), using the
LowN grating at 10um, followed by a dark frame. The difference frame
should look like Figure 3.3, with the signal at ranging up to 500,000ADU. |
 |
4 Sensitivity
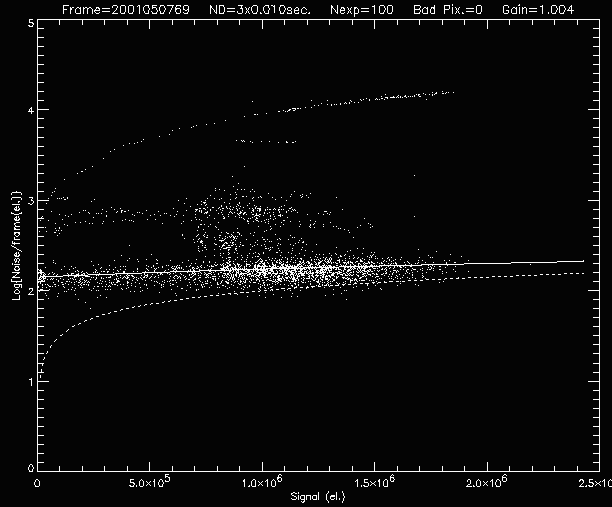
4.1 (Frames 14 and 15) The imaging path is selected
and two chopped observations are taken using ND sampling, one of
the BlankB filter to measure the low background sensitivity, and
one using the E116B10 filter to measure the high background sensitivity.
Analyse the noise on frames which have been reduced with ORAC_DR
recipe CHOPCONV, using the IDL tranchop.pro programme. The measured
gain values should be ~1.0 in both cases, and a good fit should
be seen for the theoretical curve transfer (signal v noise) curve
on the scatter plot. Typical 'tranchop' output is shown in Figure
4.1. The dotted curve shows the ideal shot noise target, and the
solid curve shows the shot noise plus a read noise of 1000 electrons
(which is reduced by the ideal theoretical factor for non-destructive
sampling). The gain which would fit the median data point is displayed
at the top left of the plot.
|
 |
| |
| |
| |
| |
| |
| |
|