|
|
| 3.1 Cover
the aperture in the filter cover plate and remove the eleven
screws which hold it down to the filter wheel assembly. |
| Comments: |
Done
by: |
|
| Checked
by: |
|
|
| 3.2 To
remove the motor drive, undo the four screws holding the worm
gear support bracket onto the main structure, rotate the Oldham
coupling to allow the gear to be removed and remove the gear
and bracket together. |
| Comments: |
Done
by: |
|
| Checked
by: |
|
|
| 3.3
To remove the filter wheel, remove its cover plate, (leave the
cover plate on the other filter wheel), and undo the four sprung
Allen screws which hold down the brass coloured bearing cover. |
| Comments: |
Done
by: |
|
| Checked
by: |
|
|
| 3.4
Underneath is a brass coloured block held in place by two hex
screws. Slacken these slightly (you will need to hold the filter
wheel to stop it rotating), then lay the assembly flat, with
the block uppermost and the wheel supported on its central cover
plate. As you undo the two screws the filter wheel will drop
down onto its support. The rest of the assembly can then be
lifted clear. |
| Comments: |
Done
by: |
|
| Checked
by: |
|
|
| 3.5
Remove the block and the four Belleville washers as well as
the two bearings from either side of the filter wheel. Note
that the bearings should have the two markings facing each other,
on the inner side of the bearing pair. Also, it is the bearing
with the smaller chamfer in its inner diameter which mounts
first on the filter wheel. |
| Comments: |
Done
by: |
|
| Checked
by: |
|
|
| 3.6
Repeat the procedure for the other filter wheel, remembering
to to keep the parts marked and separate. |
| Comments: |
Done
by: |
|
| Checked
by: |
|
|
|
|
 Remember to update the filter manifest at the same time as installing
them in the wheel.
Remember to update the filter manifest at the same time as installing
them in the wheel. |
| 4.1
Filters may be installed/removed with or without dismantling
the wheels from the Filter Module. If a wheel has
been removed, Support the filter wheel so that it is raised
up a few inches, with the retaining clips on top as shown in
Figure 4.1. Otherwise lay the full assembly on blocks
with the appropriate wheel uppermost. Remove the sheetmetal
filterwheel cover and drive the lower wheel motor by hand until
a clear position is in the light path. This allows
the special mounting tool access to filters in the upper wheel.
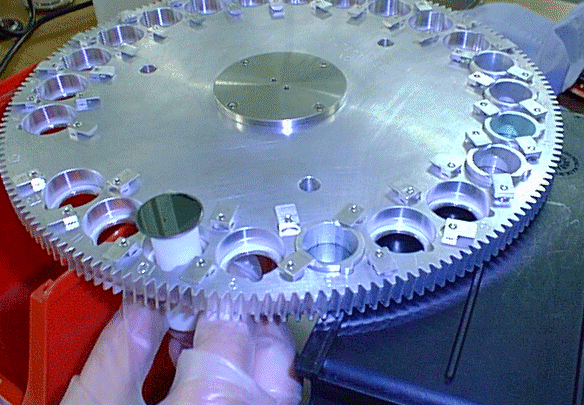
Figure 4.1. Mounting filters in
filter wheel A1 using the special tool.
|
| Comments: |
Done
by: |
|
| Checked
by: |
|
|
| 4.2
Mount a melinex film washer in the empty filter wheel socket
to protect the filter from being scratched by the socket. |
| Comments: |
Done
by: |
|
| Checked
by: |
|
|
| 4.3
Insert the special filter mounting tool through the socket from
underneath, place the filter on it and retract the tool to leave
the filter in the socket, as shown in Figure 4.1. If the filter
comprises two elements (i.e if it has a blocking component),
separate them using a melinex washer. |
| Comments: |
Done
by: |
|
| Checked
by: |
|
|
| 4.4
Place a melinex washer on top of the filter stack to protect
it from the locking filter spacer. |
| Comments: |
Done
by: |
|
| Checked
by: |
|
|
| 4.5
Place the locking filter spacer (shown at the right in Figure
4.5) carefully in the socket, using the tongue and groove feature
to seat it properly. Some filters will have cylindrical aluminium
spacers (2.75mm thick for the OCLI silicate set) which must
be mounted in the socket before the locking spacer.
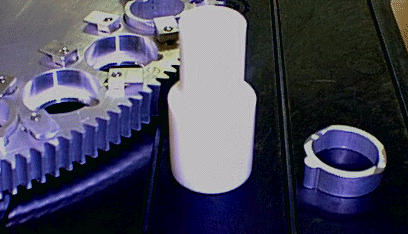
Figure 4.5. The special filter
insertion tool (white) and an aluminium filter spacer (right).
|
| Comments: |
Done
by: |
|
| Checked
by: |
|
|
|
The distance that the upper surface of the locking filter spacer
projects sets the force that will be exerted on the filter.
If the limit of 3mm is exceeded the filter may break. |
| 4.6
Check that the upper surface of the filter spacer projects no
more than 3mm above the surface of the filter wheel and is parallel
to it. Carefully lift, twist and lower the filter retaining
clips into the indents in the locking filter spacer. |
| Comments: |
Done
by: |
|
| Checked
by: |
|
|