|
 The cryostat is equipped with two vacuum ports, one for evacuation
and the other for gauges, leak testing and/or a secondary
pump if required.
The cryostat is equipped with two vacuum ports, one for evacuation
and the other for gauges, leak testing and/or a secondary
pump if required.
|
|
 The Edwards Model EXT70 turbo pump (rated at 45 litres/second,
and fitted with a KF40 flange) must only be operated in orientations
where it is hanging below (or at) the horizontal plane. It
should never be run above the horizontal plane.
The Edwards Model EXT70 turbo pump (rated at 45 litres/second,
and fitted with a KF40 flange) must only be operated in orientations
where it is hanging below (or at) the horizontal plane. It
should never be run above the horizontal plane.
|
|
1.1 Reduce the vacuum vessel pressure
to <0.2mBar using a roughing pump (this should take about
8 hours), then use the turbo pump to get the pressure down
to <1E-3 mBar.
|
| Comments: | Done
by: | |
| Checked
by: | |
|
|
1.2 Leak test the cryostat, remembering
to check the window seal (this may mean removing the window
cover).
|
| Comments: | Done
by: | |
| Checked
by: | |
|
|
1.3 If the instrument is planned to be
kept cold for several months, it should be pumped for a minimum
of three days, with five days recommended. The cryostat may
also be back-filled with grade 3 nitrogen on the second day
of pumping to help clean it out, though this process can be
ignored if it has not been opened up.
|
| Comments: | Done
by: | |
| Checked
by: | |
|
|
1.4 The pre-cool procedure should only
be started once the measured outgassing rate is well below
1E-4 torr litres per second (cryostat volume = 1.5 cubic metres).
In other words, if the turbo pump is valved off, the pressure
should rise at less than 0.2E-3 mBar per hour. For information:
at this outgassing rate, ice will be formed at a rate of 15
milligrammes per day.
|
| Comments: | Done
by: | |
| Checked
by: | |
|
|
Wear suitable clothing (gloves, face-mask etc.). The
nitrogen pre-cool produces a lot of nitrogen gas, especially
in the first couple of hours. Be sure that the area is well
ventilated and use an oxygen level monitor with an audible
alarm. Do not under any circumstances remove
the fill pipes from the cryostat while Nitrogen cans are full. This
would cause liquid Nitrogen to spurt out under pressure causing
serious injury.
|
|
Be careful not to put any excessive strain where the pipe
goes into the instrument as this might cause a vacuum leak
into the main cryostat. The pipes need to be supported and
you should monitor the vacuum pressure closely during dewar
changeovers.
|
|
This is currently a ~26 hour procedure when done without interrupts.
The temperature v time plot for the September 1999 cooldown
is shown in Figure 2.1.
PIC?
Figure 2.1. Pre-cool curves from log file 990908_0849.log.
The horizontal scale is time [hours], and the vertical scale
is temperature [K].
|
|
The volume of liquid nitrogen required is approximately 600
litres. Figure 8.2.2 shows the rate at which the nitrogen is
consumed and the corresponding temperature reached by the grating
drum.

Figure 2.2. Typical rate of consumption
of liquid nitrogen during the cooldown procedure.
|
| 2.1 The nitrogen cooling
circuit should always be under
vacuum when not in use. Backfill the cooling circuit with dry
nitrogen gas and connect the liquid nitrogen fill pipes to the
instrument as shown in Figure 2.3. The fill pipes going to the
radiation shield tank are on the left, those to the optics are
on the right. The tanks are filled through the lower right-hand
pipe which goes to the bottom of the optics tank, and they are
drained from the top-left pipe, which leads to a flask containing
the auto-fill sensors. The auto-fill system uses the sensed
nitrogen level in the outflow tank to control the valve on the
storage dewar. |
| Comments: | Done
by: | |
| Checked
by: | |
|
| DATE/TIME: |
|
AIM To leave
the cryostat in a safe state during or after the nitrogen
pre-cool procedure by emptying the pre-cool chambers of liquid
nitrogen and evacuating them of all gas.
|
|
3.1 Changing the Dewars
A sharp temperature rise on radiation shield LN2 can indicate
an empty dewar.
Two people are needed for this operation equipped with
protective clothing (gloves, face-mask). Close
the N2 supply valve on the storage dewar and switch off the
auto-fill system. One person should support
the fill pipe while the other removes the solenoid from the
dewar. Take the empty dewar away and replace
with a full one, reconnect the solenoid, open valve, switch
on auto-fill system and check the flow of N2.
|
|
3.2 Close the N2 supply valve on the
storage dewar.
|
| Comments: | Done
by: | |
| Checked
by: | |
|
|
3.3 Remove the fill pipe from the storage
dewar and aim it at a container suitable for liquid nitrogen.
Remove the drain pipe from the auto-fill sump and quickly
insert a bung or plug in its end. The nitrogen should be blown
out of the instrument through the fill pipe. If necessary
use a low pressure supply of nitrogen gas to pressurise the
tank using the drain pipe.
|
| Comments: | Done
by: | |
| Checked
by: | |
|
|
3.4 Remove the drain and fill pipes, then defrost and
dry out the bare pipe flanges where they exit the cryostat.
Fit a safety pop-off valve on every flange (to avoid an over-pressure
explosion caused by any liquid that might be left in the tank
or one of the fill pipes).
|
| Comments: | Done
by: | |
| Checked
by: | |
|
|
3.5 Fit a vacuum valve and evacuate the nitrogen tank
to a pressure of <2E(-3)mBar. Close the vacuum valve and
remove the pump. The pipework should then appear as shown
in Figure 3.1. (NEED THIS PHOTO)
|
| Comments: | Done
by: | |
| Checked
by: | |
|
|
3.6 To Restart the pre-cool, backfill the tanks
with dry nitrogen gas until the pop-off valves pop-off.
|
| Comments: | Done
by: | |
| Checked
by: | |
|
|
The CTI1020 cold head should get the optics down to its operating
temperature of 25K in around 160 hours without supervision.
Maintaining liquid nitrogen in the radiation shield pre-cool
tank will reduce the cooldown time by 40 hours or so. |
|
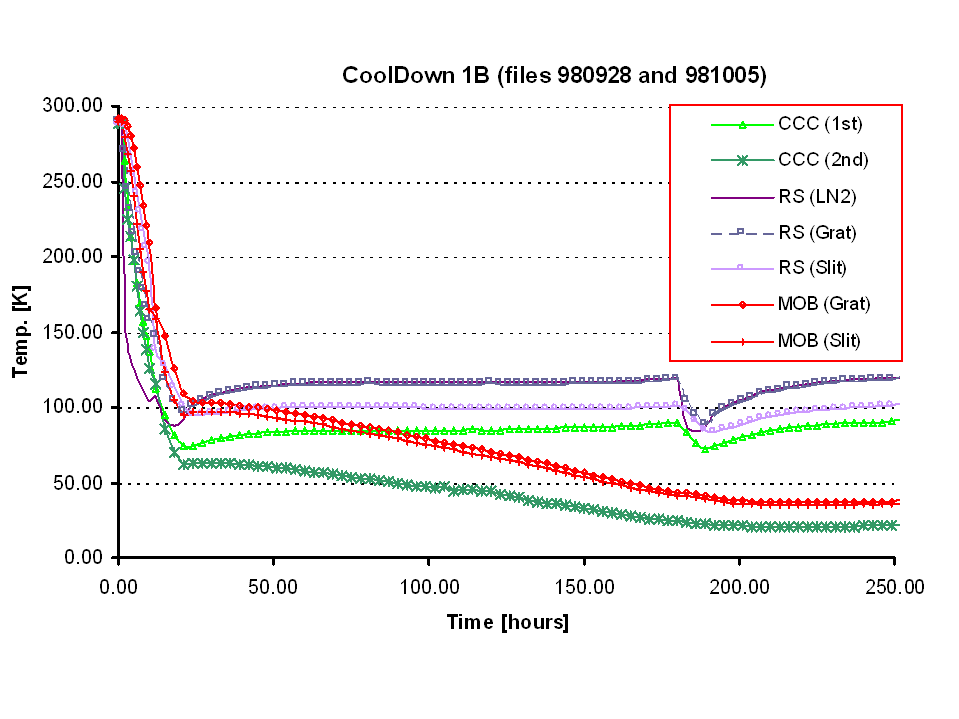
Figure 4.1 Cooling
with the CTI1020, October 1998. The main optics (red) are
seen to reach their final temperature (32K) after some 200
hours. The target for the main optical bench is 25K in 140
hours.
|
|
The following table records the dates
when the main Michelle optical bench was cooled to <100K.
|
| Cooldown |
Warm-up |
Period Cold [weeks] |
Notes |
| 24/8/98 |
30/8/98 |
1.0
|
Mechanism tests. No filters or detector
installed. |
| 28/9/98 |
12/10/98 |
2.0 |
Mechanism tests. No filters or detector
installed. |
| 12/11/98 |
21/11/98 |
1.5 |
Detector and filter
wheels fitted for this cooldown |
| 11/12/98 |
5/2/99 |
8.0 |
System testing with warm (but operable)
detector and grating drum stuck at LOW_N |
| 22/3/99 |
24/3/99 |
0.3 |
Grating drum jammed |
| 21/4/99 |
5/5/99 |
2.0 |
Detector electronics fault |
| 8/9/99 |
8/10/99 |
4.5 |
Grating drum jammed |
| 1/1/00 |
24/3/00 |
11.5 |
System tests. High background - Excessive
flexure - Grating Drum Operates Erratically. |
| 14/6/00 |
18/8/00 |
9.2 |
Imager Only |
| 18/10/00 |
20/1/01 |
13.5 |
New Grating drum |
| 9/3/01 |
27/3/01 |
2.0 |
Gemini Fore-optics fitted - blockage
in Spectrometer path |
|
|
|
|
|
|
|
|
|
|
50.5 |
TOTAL PERIOD COLD WITH DETECTOR FITTED |
|
|
|
|
|
|
|
|